I made this little hat to take to the Knitter’s Fantasy for the Caps for Kids contest.. Then I forgot to take it!
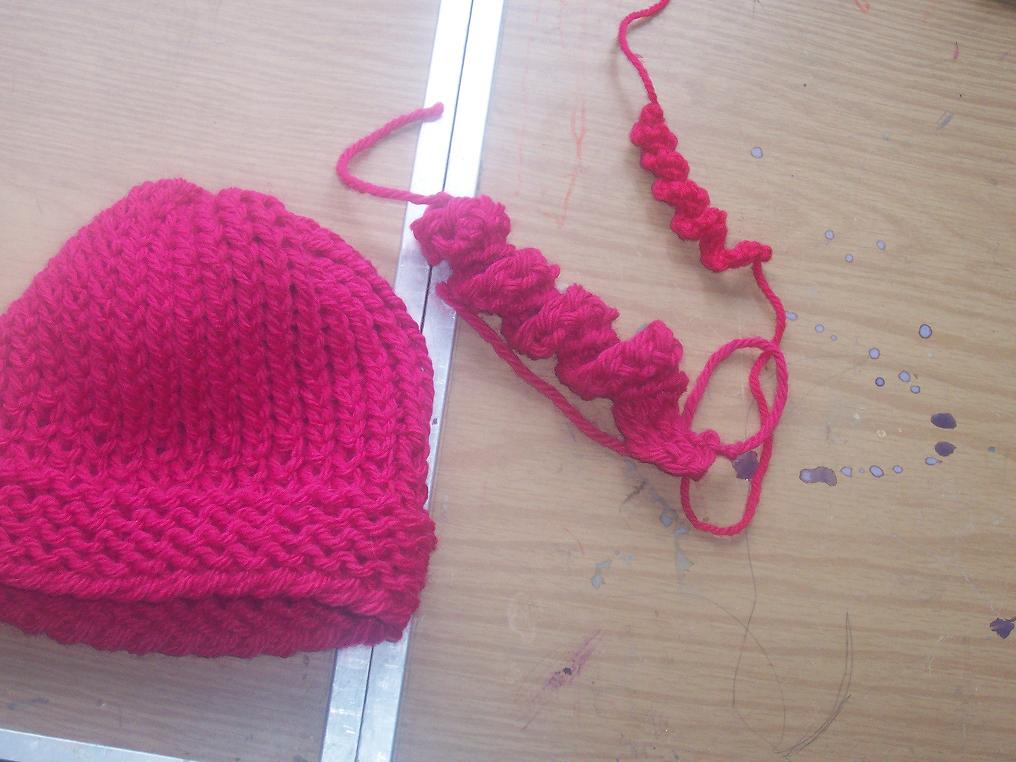
The little corkscrews were supposed to go on the top as a crazy topper for the hat. I thought I would share with you how I made them. It was quite easy and quick and they would make a great fringe for a scarf!
The larger one was made with Lion Brand Jiffy on the red Knifty Knitter loom, the little one was made with Knit Picks wool (a worsted weight) on my fine gauge toddler sock loom from Decor Accents.
Note: Keep in mind these are general directions that will work on basically any loom. You will need to use yarn that is appropriate for your loom so you will get a rather tight knit. Use chunky or bulky weight yarns on the Knifty Knitter looms and worsted weight if you have a small gauge loom.. The more stitches you cast on the longer your corkscrew will be. I cast on all the pegs on both looms that I used.
Ok here we go:
Corkscrew Fringe
Cast on at least 20 pegs on your loom. I recommend the cable cast on as it is a nice and tight cast on. (Thanks Isela!)
Then turn as for a flat piece and skip the first stitch bringing your yarn from the back between the pegs 1 and 2 to the front of your work.
1. Knit the stitch on the next peg using the flat stitch. (That is where you simple hold the working yarn in front of the peg above the loop that is already there and lift the loop up and over the working yarn.
2. Then you will bring your yarn around the same peg (counterclockwise) with and e-wrap and knit off.
3. Then you will bring your working yarn around to the front of the same peg again (going around in a counter clockwise direction) and knit another flat stitch on that peg.
So you are knitting 3 stitches on the same peg.. flat, e-wrap, flat.
Then move to the next peg and repeat steps 1-3 again one peg at a time till you reach the end of the row.
Then turn and cast off purl-wise….
To cast off purl-wise:
1. E-wrap the first peg and knit off then move tot he next peg and e-wrap the second peg and knit off.
2. Lift the loop off the first peg and place it on the second peg.
3. Pull the bottom loop up and through the new loop as if to purl, lift the upper loop off and behind the peg and place the lower loop onto the peg.
4. Repeat steps 1-3 till all pegs are cast off. Then cut your working yarn leaving a 3 inch tail and pull it through the last loop to secure.
You should have a nice little corkscrew.. you may have to give it a little twist get it to curl up a little tighter for you.
©Denise Mae Layman All Rights Reserved. Please note this pattern is copyrighted material. You may print a copy of this pattern for your own personal use and enjoyment, but editing, publishing, transmitting, e-mailing, posting it in part or whole to a list service or database, or otherwise commercially exploiting this pattern is strictly forbidden.
BTW I have noticed that we have gotten a lot of guests here from around the world, like from Italy, Canada and even Saudi Arabia! Please, take a minute and leave me a comment and let me know what you think, and where you are from!!Or if you would Click Here and review my site!
I will try to get a link to my Frapper Map up later today! So look for that as well!
Leave a Reply